

One Ball Supreme Kit - Wax
The supreme adjustment kit:
For whom?
We have designed this kit at the same time as the Supremely Hot Tune Kit, so that it could be used by snowboarders and skiers.
This kit contains almost everything you need to prepare your equipment. You need smooth, sharp and rusty squares. And you need a little Fart on the basis to get the most out of your equipment and your day.
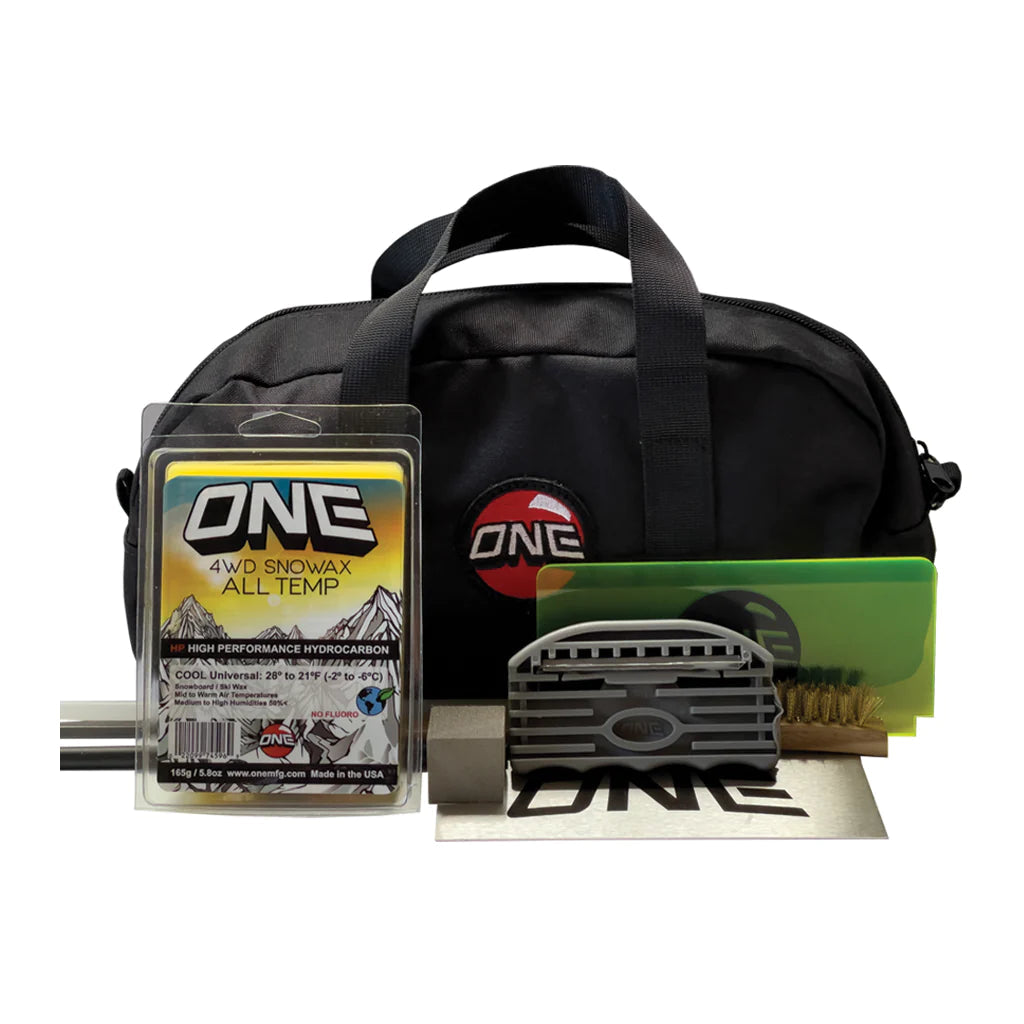
Includes: 4WD cool 165g bar (proven world cup formula), a large cutting tool, a metallic file of 8 ", a gum stone, a file to file, a scratch of 6", a metal scraper, sticks White and black p-tex, and a high quality and long-lasting personalized zipped pocket to store everything. (For the moment, the kit is delivered in the Blue Stix color bag).
According instructions:
1. Place the board or skis in a vice to secure them and clean the base with a fresh hot fart and scratch or use the basic one MFG cleaner.
2. Check that the side and the sole edges do not have burrs. Rub a ceramic, diamond or gum stone on the area to remove the burrs in preparation for the shaping of the squares.
3. Use the ONE MFG edge tool to sharpen the side edges. Start with the tip and pull gently with firm pressure to the tail. Proceed by regular passes until the edges are well sharpened. Repeat the operation on the other side. Do not forget to return the file so that the teeth are oriented in the right direction ... Find the arrow.
For whom?
We have designed this kit at the same time as the Supremely Hot Tune Kit, so that it could be used by snowboarders and skiers.
This kit contains almost everything you need to prepare your equipment. You need smooth, sharp and rusty squares. And you need a little Fart on the basis to get the most out of your equipment and your day.
Includes: 4WD cool 165g bar (proven world cup formula), a large cutting tool, a metallic file of 8 ", a gum stone, a file to file, a scratch of 6", a metal scraper, sticks White and black p-tex, and a high quality and long-lasting personalized zipped pocket to store everything. (For the moment, the kit is delivered in the Blue Stix color bag).
According instructions:
1. Place the board or skis in a vice to secure them and clean the base with a fresh hot fart and scratch or use the basic one MFG cleaner.
2. Check that the side and the sole edges do not have burrs. Rub a ceramic, diamond or gum stone on the area to remove the burrs in preparation for the shaping of the squares.
3. Use the ONE MFG edge tool to sharpen the side edges. Start with the tip and pull gently with firm pressure to the tail. Proceed by regular passes until the edges are well sharpened. Repeat the operation on the other side. Do not forget to return the file so that the teeth are oriented in the right direction ... Find the arrow.
4. If you like your board or skis to be stuck in the spatula and heel, Dam up them using a stone to be amazed to round the edges of the spatula and the heel. Start with the squares going up to the spatula and the spatula and file up to about 1.5 "after the contact point of the crossroads, when your base is flat. Keep your clean edge tool with the brush to file !
5. To obtain very clear edges, use a fine diamond stone or a polishing stone and go back to the edge using the same technique.
6. If you like to use rails and boxes, do not cross your edges much to prevent them from hanging on.
7. Clean the base with a dry towel before waxing it.
8. Choose your favorite wax for the day. Use the All-Temp wax if you have no idea about temperatures.
9. Epilate your hot wax base for 10 to 15 minutes. Do not let the iron smoke.
10. When the wax is cooled, scrape it with a plastic raclette.
11. Brush the base
12. Take advantage of speed!
Instructions for the application of the wax to rub:
1. Dry the base
2. Hot base if possible (easier to wax).
3. Wear a glove to protect the edges.
4. Put the wax into the base by exerting pressure. Apply to cover completely.
5. Use cork to polish the wax in the base.
6. Scraped slightly (if possible).
7. Brush or polish lightly to remove the excess wax.
Pro advice:
When you place the-edge cutting on your edge. The number of degrees on the tool below the file is the number of bevels that the guild provides on board.